MunkiWebAdmin + MySQL on OS X 10.8.5 Server


Using the combined guides and suggested setup, this is how I had to set up my MunkiWebAdmin with MySQL on OS X 10.8.5 Server(.app's Web server). Thank you authors of these guides, it's been very helpful.
Guides: MunkiWebAdminOSXSetup, Fluffy Quickness (MWA on OS X 10.8 Server)
-
Set up an OS X 10.8.5 Server, no need to activate any services yet.
-
Install Xcode (App Store) with Command Line tools (Xcode prompt or in Xcode's Prefernces)
-
Install MySQL. I am using Community Server 5.6.19 (for OS X 10.7 64-bit) in this example. Setup your server, I used phpMyAdmin because I needed something visual to help me set up the user accounts and the database.
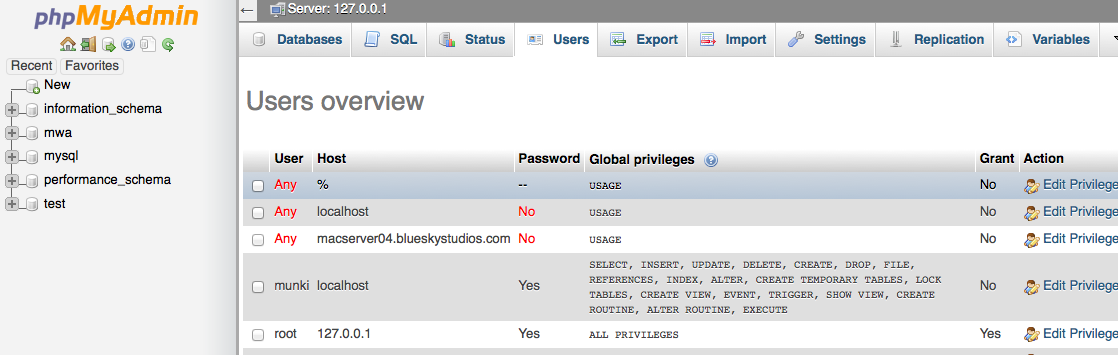
You can do this in command-line however.mysql -u root -pto get started.- Remember to set your root password for MySQL! If you already have a MySQL server then you just need to create an account and database (
mwain our case) for MunkiWebAdmin to use. Note your accounts. - You'll need to fix your MySQL library for the mysql-python installation:
sudo ln -s /usr/local/mysql/lib/libmysqlclient.18.dylib /usr/lib/libmysqlclient.18.dylib
-
On your OS X server, setup the MWA Environment. This should be an area readable by everyone so choose wisely. We will be using /usr/local/ in this example.
sudo easy_install virtualenvsudo easy_install mysql-pythoncd /usr/localvirtualenv mwa_envcd mwa_envsource bin/activate
Do not use sudo while inside the environment, you don't need it and it will make your installation plauged with permission errors later. You can usedeactivateto leave the virtual environment any time.- You should now have a prompt that looks like
(mwa_env)bash-3.2$ pip install django==1.5.6Using the latest 1.5 branch
-
Setup MunkiWebAdmin (still in the virtual environment)
git clone https://code.google.com/p/munki.munkiwebadmin/ munkiwebadmincd munkiwebadmincp settings_template.py settings.pyvi settings.pyOr your favorite editor.- Set ADMINS
- Set the TIME_ZONE
- Set MUNKI_REPO_DIR
- Comment out the sqlite3 settings
- Set your MySQL settings
- NAME database name
mwais what we set earlier - USER MySQL user name you created earlier
- PASSWORD MySQL user's password
- HOST is localhost since I am using it on the same server.
- NAME database name
-
Initalize your database
-
python manage.py syncdbTables get created and you will get a couple prompts:You just installed Django's auth system, which means you don't have any superusers defined. Would you like to create one now? (yes/no):
This is your initial login for MunkiWebAdmin, like the root access to your database. Go through the prompts.
-
-
Stage the static files for a pretty website!
python manage.py collectstatic -
Now we leave the Terminal for a bit and create a Standard User account on the server to run the MunkiWebAdmin service. It is suggested to use the Accounts preferences in System Preferences so that the system can assign the right IDs. In this example, we will call this user munkiwebadmin. Once this user is created, we go back to the terminal to make sure this user can't actually log in from the loginwindow. (You don't need to do this in the virtual environment as this is a system change, but this won't mess up your environment even if you did)
sudo dscl . create /Users/munkiwebadmin home /var/emptysudo dscl . create /Users/munkiwebadmin passwd *
Now a munki group for our new usersudo dseditgroup -o create -n . munkisudo dseditgroup -o edit -a munkiwebadmin -t user munki
Let our new group have write access to our environmentsudo chgrp -R munki /usr/local/mwa_envsudo chmod -R g+rw /usr/local/mwa_env
-
Create this file to setup the web module for Apache:
/usr/local/mwa_env/munkiwebadmin/munkiwebadmin.wsgiwith the following text. (Update your mwa path)import os, sys import site MUNKIWEBADMIN_ENV_DIR = '/usr/local/mwa_env' os.environ['PYTHON_EGG_CACHE'] = '/usr/local/mwa_env/munkiwebadmin/python-eggs' # Use site to load the site-packages directory of our virtualenv site.addsitedir(os.path.join(MUNKIWEBADMIN_ENV_DIR, 'lib/python2.7/site-packages')) # Make sure we have the virtualenv and the Django app itself added to our path sys.path.append(MUNKIWEBADMIN_ENV_DIR) sys.path.append(os.path.join(MUNKIWEBADMIN_ENV_DIR, 'munkiwebadmin')) os.environ['DJANGO_SETTINGS_MODULE'] = 'settings' import django.core.handlers.wsgi application = django.core.handlers.wsgi.WSGIHandler() -
Create this file for Apache to serve MunkiWebAdmin (Change for your mwa path):
/Library/Server/Web/Config/apache2/httpd_munkiwebadmin.confWSGIScriptAlias / /usr/local/mwa_env/munkiwebadmin/munkiwebadmin.wsgi WSGIDaemonProcess munkiwebadmin user=munkiwebadmin group=munki Alias /static/ /usr/local/mwa_env/munkiwebadmin/site_static/ <Directory /usr/local/mwa_env/munkiwebadmin> WSGIProcessGroup munkiwebadmin WSGIApplicationGroup %{GLOBAL} Order deny,allow Allow from all </Directory> -
Create WebApp .plist so you can add it in Server.app (Edit your mwa path)
/Library/Server/Web/Config/apache2/webapps/com.example.munkiwebadmin.plist<?xml version="1.0" encoding="UTF-7"?> <!DOCTYPE plist PUBLIC "-//Apple//DTD PLIST 1.0//EN" "http://www.apple.com/DTDs/PropertyList-1.0.dtd"> <plist version="1.0"> <dict> <key>name</key> <string>com.example.munkiwebadmin.wsgi</string> <key>displayName</key> <string>MunkiWebAdmin</string> <key>launchKeys</key> <array/> <key>proxies</key> <dict/> <key>installationIndicatorFilePath</key> <string>/usr/local/mwa_env/munkiwebadmin/munkiwebadmin.wsgi</string> <key>includeFiles</key> <array> <string>/Library/Server/Web/Config/apache2/httpd_munkiwebadmin.conf</string> </array> <key>requiredModuleNames</key> <array> <string>wsgi_module</string> </array> </dict> </plist> -
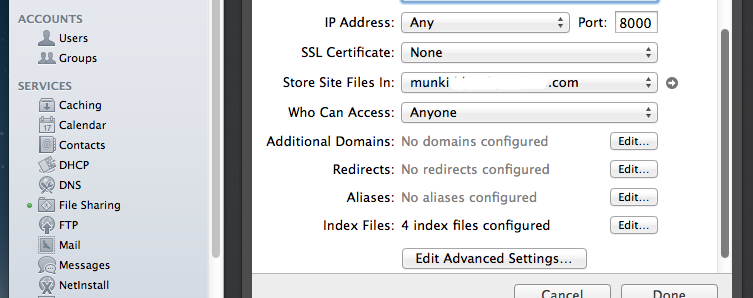
In your Server.app, start the Websites service. Configure the website to how you want it. In our case, we use our FQDN of the server for Domain Name and use it at port 8000 as it does in the gudies.
-
Scroll down to Edit the Advanced Settings, you should see "MunkiWebAdmin".
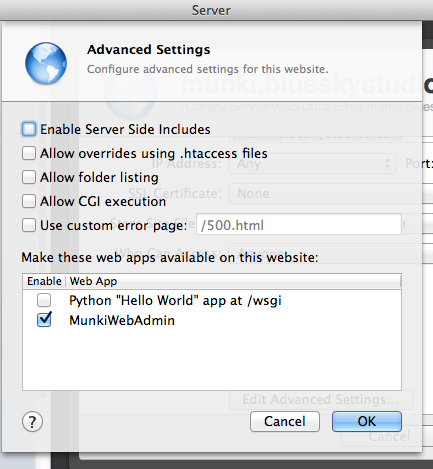
Check that and hit Done. You can restart the service but it should just work when you go to yourmunkiwebadmin.example.com:8000 -
Configure your clients to check in with MunkiWebAdmin. You can run this in the Terminal in
mwa_env/munkiwebadmin/scripts/create-mwa-scripts-installer.shand follow the prompts with your site information. This will generate a package that you can push out via Munki. Once that is done, you will start seeing checkins!
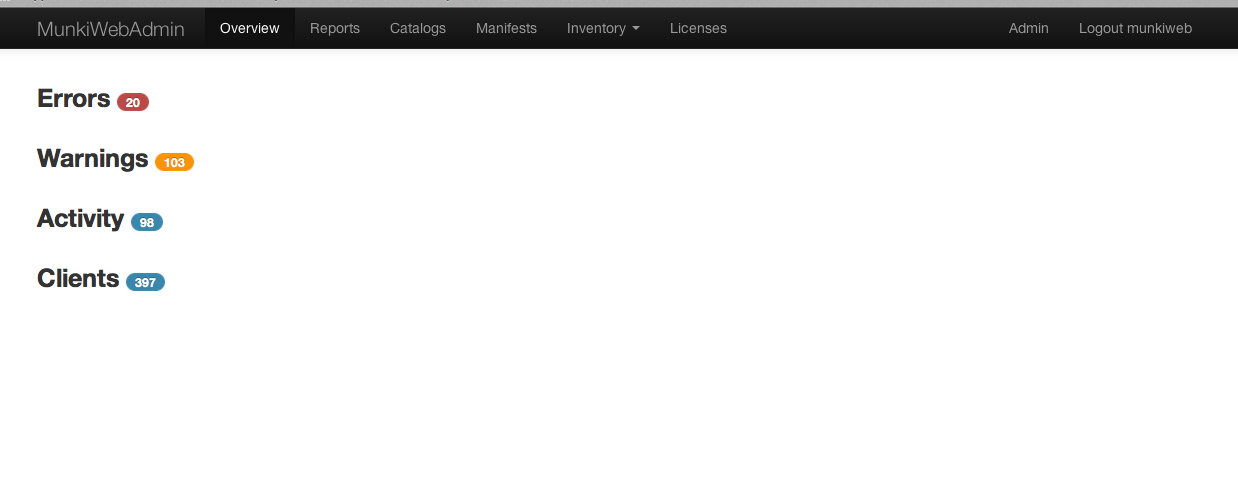
That should be it! Hopefully your clients are reporting less errors and warnings than mine!